Tuesday, June 25, 2013

Foodie Favorites

As mentioned in my last post, I'm going to start doing posts about the healthy foods that I've been enjoying, discovering and learning more about. I will throw in a few tips that I've acquired too.

1. Coconut Oil : I have known for a while about coconut oil. I've used it many times when making Paleo Toast Crunch  . Coconut Oil is a solid at room temperature and it melts at different temperatures depending on what coconut oil you are using. It works wonderfully in the Paleo Toast Crunch to hold everything together. Someone recommended putting coconut oil on my air popped popcorn instead of butter. Let me tell you, it was heavenly. It is even HUSBAND APPROVED! After discovering this, I put it on my corn on the cob and potatoes instead of butter and it was equally as good. Soon I hope to healthify a favorite of mine, Chicken Kiev,  using coconut oil instead of butter. This is the one that I use

 2. Stevia : Have you heard of Truvia or Splenda? They are common sweeteners. Problem is they are composed of chemicals. Stevia is plant based, which is awesome. I have powdered stevia that I use just as I would use regular sugar. I put it in my steel cut oats and I put it in my coffee. When I want to add flavor to my coffee I use vanilla or peppermint stevia. There are many different flavors that NuNaturals carries of stevia. There is an unflavored Clear Stevia as well in case you want to add your own flavor. NuNaturals is my favorite brand of stevia because it doesn't leave a bitter after taste like many other stevias on the market.


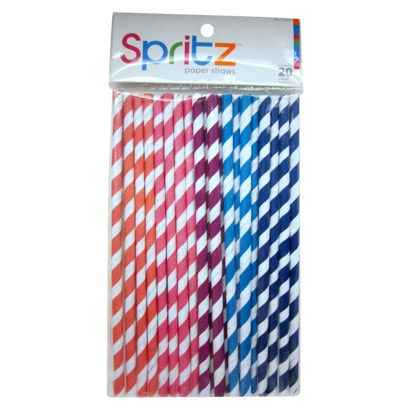
3. Paper Straws: (I know they aren't 'food' but they help with food!) I get mine from Target. They make drinking all that water so much easier. I love drinking out of them. A down side though is if you wait too long, they do get soggy. Nothing a new straw or drinking the last bit without a straw won't help. Sometimes flipping the straw around helps too. There are other packs that have different colors too. They are usually kept near the party supplies.
4. Shakeology:  This can be as a snack or as a meal replacement. I have been loving it for breakfast to give me the energy to go run around with Kindergartners, First and Second graders early in the morning at camp.The days that I don't have it for breakfast I usually bring it for a quick and easy lunch or dinner. Some people prefer for their shakes to sit a while in the refrigerator before they drink it. I didn't notice much of a difference. Today I attempted to make my shake into pudding to eat for breakfast! It's so fun to play around with different proportions of ice and milk to make different consistencies. Make sure to click on the link to learn more about it! Initially it seemed really expensive to me, but it comes out to 4 dollars a day ( less than a trip to Starbucks or the drive thru and a whole lot healthier). I love all the health benefits that I get from Shakeology and I know that it has helped to curb my snacking and cravings. I have a hard time getting in all of my veggies, and thanks to Shakeology I know I am getting what my body needs. I currently have the Chocolate Shakeology, but there are many different flavors. Next month I am getting the BRAND NEW Vanilla! I will be sure to let you know how it is! Oh yea, and there are SO MANY different recipes to try with Shakeology so it doesn't get boring!

This is just a start to my food favorites! I will update more in another post so be looking out for it.

What is your favorite healthy food?
Have you tried Shakeology? If so, what is your favorite kind & recipe?

I look forward to hearing from you.
Kate

Sunday, June 23, 2013

Fitness Fun #1

I have officially completed two weeks of Insanity! When I got the program for my birthday in March, my husband and I started doing Insanity together. We quickly couldn't find time to keep doing the program together due to college classes and work not lining up. The days he had class early, I didn't and the days I had class early he didn't.  Way back in March we made it through the first week and into a few days on the second week. I'm thrilled that I have came this far in the program!
Since joining this challenge group I have found that I have lost my excuses not to work out. I know that I need to and that I have to report back on what workout I did. Granted, I could just say that I did the workout when I really didn't, but who is that hurting? ME! It will show when my progression pictures aren't showing progress and my measurements aren't changing for the better. I have fell in love with the feeling after having a wonderful workout.
I've made it a game with myself when I'm working out to see how many calories I can burn during a certain move. It keeps me pushing harder when I feel like quitting. Most recently, my personal highest burn for a workout has been 524 calories!
What's something that keeps you motivated to working out? It's said that a habit is formed in 21 days. Well I'm 14 days down WOOOHOOO!
I have to admit that my eating hasn't been as on track as I would like it. I am drinking Shakeology every day which has all of my servings of fruits & veggies in it. I wouldn't have guessed that it tastes as good as it actual does because it is so healthy. My favorite recipe so far is 1 scoop Shakeology, 1 cup Almond Milk , 1/4 tsp of Mint Extract and Ice. A little water may need to be added as well depending on the amount of ice that was added and how thick you want it.

A few of my favorite healthy alternatives will be posted soon.
As always, comments and emails are welcome.
Kate

Thursday, June 13, 2013

Text on Canvas Tutorial

This is the long awaited tutorial on one of the wedding gifts I gave my cousin whose wedding I was in last weekend.
First and foremost, the materials you will need are:
- a blank canvas  (I got mine from JoAnn Fabrics etc with a 40 % off coupon)
- an idea of the text you want to put on the canvas ( mine was a well known saying that pertains to the couple)
-  a computer & printer
- pencil
- acrylic paint (again from Jo Ann Fabrics with a coupon)
- paint brush (I used a foam one)
- Sharpie
After you have gathered your supplies, grab your canvas, paint brush and paint. Apply paint to your canvas. I just poured some paint on and brushed it smooth

Feel free to take more 'care' in making sure there are no streaks or paint brush marks. I enjoyed how mine looked because I felt as though it went with my theme (sailing- it kind of looked like water to me)


Remember to paint all four sides of the canvas too.  You can choose to paint it a different color , but I chose the easy route and just painted it the same color.
Set your canvas aside to dry.

Now open up Word on your computer.
Side Note: I previously downloaded 'fun' fonts from a website for free. The website I used for this was this one and I followed the directions to get the fonts downloaded to my computer.

Once your computer has Word open, type out the saying or words that you want to transfer onto the canvas. Along with this make sure you take time to choose your font and size you want. Keep in mind that you will need to be tracing and replicating the font so choose wisely.

Now print out your word document.
Cut out and lay each word on your canvas. Make changes if needed to font and size. Ensure that you like how the font looks on the canvas.

Next  I took each word at a time off to make sure I didn't mess up my placement of the words. I flipped the word over and began to color on the back with a pencil. There is no specific pattern that needs to be followed, just make sure there is graphite on the back side of the word (this is what is going to transfer to the canvas). Along with this, you will be able to see the font through the back of the paper so make sure that all of the places that the font is has graphite covering it.
**** I recommend doing each word one at a time. From this step until you trace it with Sharpie then begin here again with the next word****
Flip the word back over and put in the position that you had it originally. It doesn't have to be in the exact spot as before, but ensure that you like where it is place. Begin to trace the font with your pencil. You will need to push down more than usual when tracing the letters.
Once you are done tracing the word, move the paper. You should be left with something that looks like this. If  yours didn't come out as well as this try putting more graphite (coloring more) on the back side of the paper and pushing harder when you are tracing.
{The color looks weird due to the way I edited the picture to optimize the visibility of the pencil}
Grab your Sharpie and trace over the pencil marks that were left on your canvas. I put my typed word above where I was tracing so I could refer back to it if needed. Keep in mind that you can change the font how ever you want and that you don't have to be exact to still make this canvas look great. When you display this canvas or give it as a gift the person looking at it won't know what font you used to make it. 
Continue this with all of your words until you are done. Surprisingly, it doesn't take too long to do the tracing. Again, I found that it was easiest to do it one word at a time from coloring the back of the word to tracing it with the Sharpie. 
After I was done with the front, I wrote a nice note on the back explaining why I chose this quote to give as a wedding gift. I also decided to add their wedding date to the bottom so they can read the canvas and remember their wedding day when the going gets tough.
THANK YOU for being patient for this tutorial.As always, comments and emails are more than welcome. 
Kate


Wednesday, June 5, 2013

Motivation

I am currently apart of a challenge group to keep me accountable for eating right, doing Insanity & taking measurements along with pictures during the process. Today I had to take before pictures and measurements  and send them to my coach. Looking at myself in a sports bra and shorts gives me living reassurance that I am doing the correct thing by being in this group to keep me on track. I am more motivated than ever to change myself so I have an awesome after picture.
This week is all about testing out the meal plan (based on 5 meals a day and eating clean). Today I had an ingenious idea of taking on a twist of chocolate covered strawberries. I know myself and I know that I have a wicked sweet tooth. I cut up strawberries and added some dark chocolate chips to the Tupperware that I had put the strawberries in. It was so nice to have a "sweet" snack that I didn't need to feel guilty about. I even ventured into saying that this snack tasted better than a candy bar. I am so proud of myself for coming up with something sweet to have that I know will help change my " before" picture.
 In other news, I picked up my dress that was being altered (the shoulder straps were WAY too big) for a wedding I am in this weekend.
Here is the dress. Don't mind how I had to creepily take the picture. 
Of course I will post tutorials of what I'm making the happy couple. Be on the look out for those posts! 
If only I had unlimited money, I would be able to craft so much more!
Rememeber comments & emails are always welcome 
Kate

Tuesday, June 4, 2013

Hello blog world!

I've been thinking for a while now that I should start a blog. I craft often  probably too much for my own good and it is foolish for me not to document what I am doing and to inspire people to get in touch with their crafty side.
 I'm also embarking on a weight loss journey via the Beach Body DVD series Insanity and clean eating. I will be giving real life feed back into what I am experiencing throughout this journey. Feel free to comment or email at any time.
I'm crazy enough to start a blog when my life is already extremely hectic. What can I say, I love being busy and having something to get social interaction along with feed back.
My Pinterest can be found here . I pin various things so it's worth a look! I will be documenting my pin successes & failures here too!
Keep in touch,
Kate